Microcone
Microcone manufactured by Dev-Audio Pty Ltd. has the following features:
- 7 channel audio input (cone shaped array = 1 central microphone on the top + 6 circular array on the bottom)
- USB interface
- Can be seen as an ALSA device on Ubuntu and an ASIO device in Windows
- Two firmwares
- Old firmware (Older than Apr. 2012) and New firmware (Later than Apr. 2012)
- The older devices were only operating as USB Audio Class 1.1, and did not provide the mixer interface. The new device since April 2012 has the latest USB Audio Class 2.0 which leads to much higher audio reliability for the device.
Supported Operating Systems
- Windows XP/Vista/7/8 : OK
- Ubuntu 12.04 : OK (If you see a problem of recording zeros, see the comments below.)
- Ubuntu 13.04 : OK
- Ubuntu 13.10 : OK
- For other operating systems, please tell us how it works.
Known Issue in Ubuntu 12.04 (Comment from the developper)
* There is a bug in some earlier versions of Pulse Audio, including for
  Ubuntu 12.04, that cause the microphone channel gains to be set to zero.
  This issue is not isolated to the Microcone device.

* We have confirmed that the issue can be fixed by removing Pulse Audio from
  your system.  **Note that this of course means that Pulse Audio components,
  such as sound volume icon, will no longer appear.

* To do this:
  1) Remove Pulse Audio: sudo apt-get autoremove pulseaudio
  2) Reboot
  3) Install Gnome ALSA Mixer if not already present: sudo apt-get install gnome-alsamixer
  4) In Gnome ALSA Mixer, go to the USB Mixer panel for input devices, and check the boxes to enable recording.
Microcone Tutorials on Ubuntu
Microcone Installation Instructions
The device is recognized as an ALSA device.
Therefore you don’t have to install any specific packages for Microcone.
For the installation of HARK basic packages, follow …
- HARK Installation Instructions
Device setup
Connect your Microcone to your PC.
It is recognized as an ALSA device on Ubuntu.
Check if the device is connected by the following command.
cat /proc/asound/cards
Then you will see something like
0 [PCH            ]: HDA-Intel - HDA Intel PCH
                    HDA Intel PCH at 0xf2620000 irq 22
1 [Microcone      ]: USB-Audio - Microcone
                    DEV-AUDIO Microcone at usb-0000:00:1d.0-1.2, high speed
...
If you can see DEV-AUDIO Microcone in the list.
Your Microcone is correctly mounted.
Notice that the number on the very left hand side is the sound card index.
In this example, the device is mounted as No. 1.
How to use your Microcone in HARK
We suppose you’ve read the HARK document in HARK Documentation page, and you have an intermediate level skill of HARK network file construction.
To use your Microcone in HARK, put AudioStreamFromMic module on the network and set its parameters as follows:
| Name | Type | Value | Explanation |
|---|---|---|---|
| LENGTH | int | 512 | Number of samples in one frame |
| ADVANCE | int | 160 | Shift length |
| CHANNEL_COUNT | int | 7 | Number of microphone channels |
| SAMPLING_RATE | int | 16000 | Sampling rate of the audio stream |
| DEVICE_TYPE | string | ALSA | Category of the sensors |
| DEVICE | string | plughw:* | Device name |
The asterisk in the DEVICE parameter means the sound card index.
cat /proc/asound/cards
provides the sound card index on the left hand side.
If you see
0 [PCH            ]: HDA-Intel - HDA Intel PCH
                    HDA Intel PCH at 0xf2620000 irq 22
1 [Microcone      ]: USB-Audio - Microcone
                    DEV-AUDIO Microcone at usb-0000:00:1d.0-1.2, high speed
...
set DEVICE=plughw:1 for using your Microcone.
Microcone Tutorials on Windows
Microcone Installation Instructions
- Download the latest HARK for Windows on your Windows PC from here and install it.
- Download the latest Microcone driver on your Windows PC from here and install it.
Device setup
Plug your Microcone into a USB 2.0 port of your Windows PC.
Open Device Manager and check that “DevAudio USB 2.0 Audio Devices -> DevAudio Microcone” appears
![]()
How to use your Microcone in HARK
We suppose you’ve read the HARK document in HARK Documentation page, and you have an intermediate level skill of HARK network file construction.
To use your Microcone in HARK, put AudioStreamFromASIO module on the network and set its parameters as follows:
| Name | Type | Value | Explanation |
|---|---|---|---|
| LENGTH | int | 1536 | Number of samples in one frame |
| ADVANCE | int | 480 | Shift length |
| CHANNEL_COUNT | int | 7 | Number of microphone channels |
| SAMPLING_RATE | int | 48000 | Sampling rate of the audio stream |
| DEVICE | string | microcone | Device name |
Put MultiDownSampler module just after the AudioStreamFromASIO module with the following parameters:
| Name | Type | Value | Explanation |
|---|---|---|---|
| ADVANCE | int | 480 | Shift length |
| SAMPLING_RATE_IN | int | 48000 | Sampling rate of the input signal |
| SAMPLING_RATE_OUT | int | 16000 | Sampling rate of the output signal |
| Wp | float | 0.28 | Passband edge |
| Ws | float | 0.34 | Stopband edge |
| As | float | 50 | Minimum passband attenuation |
Connect two modules like “AudioStreamFromASIO -> MultiDownSampler -> …”.
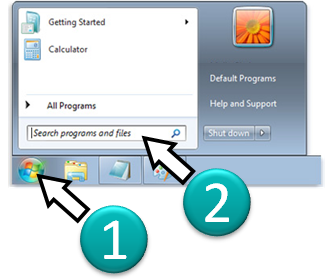
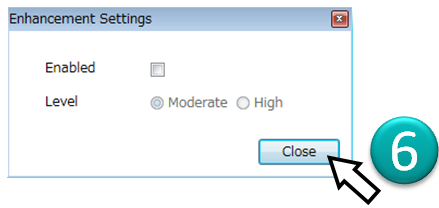
Disable DSP of Microcone by the following steps:
- Open Start menu
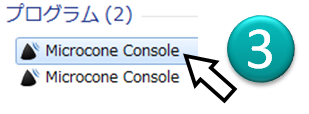
- Input “Microcone console” on the form
- Select “Microcone console” GUI
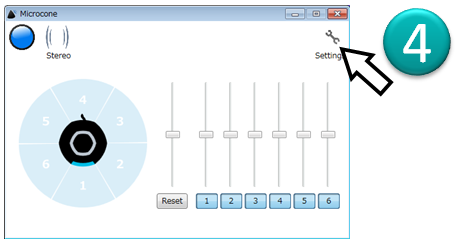
- Click “Settings”
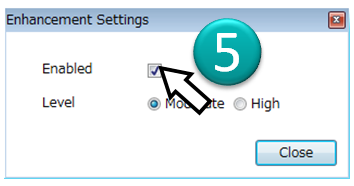
- Click “Enabled”
- Check “Enabled” unchecked and click “Close”