
Overview
HARK Designer is a web browser based graphical user interface
for building a network for a robot audition software ![]() (HRI-JP Audition for Robots with Kyoto university).
(HRI-JP Audition for Robots with Kyoto university).
Using HARK Designer, you can do the following things:
- construct a network that represents a data flow of a robot audition process
- import a .n file build by flowdesigner
- execute a network
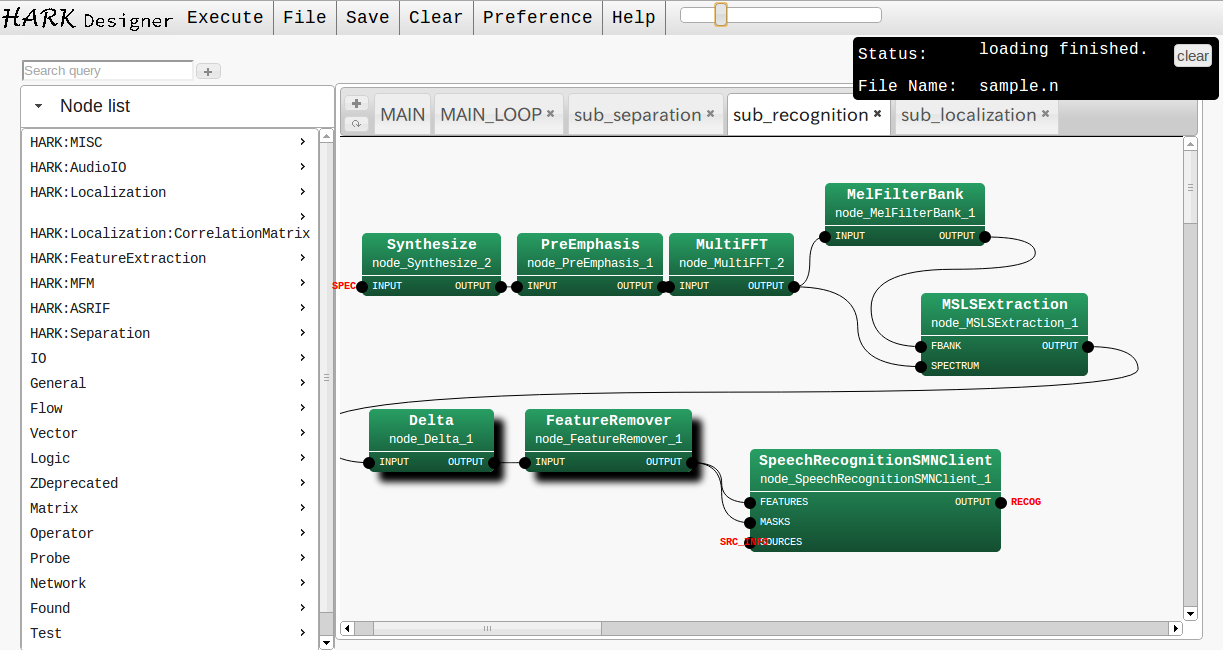
Screen shot of the HARK Designer
Getting Started
Dependent software
HARK Designer depends on software. Please install before you install HARK Designer
- node.js (An application server)
- For Windows users: Download the latest LTS version from https://nodejs.org/
- For Ubuntu users: Install v10.x from https://github.com/nodesource/distributions
- graphviz (For auto re-organizatoin)
- For Windows users download and install the latest version from http://www.graphviz.org/
- For Ubuntu users
sudo apt-get install graphviz
- Google Chrome
- Currently, HARK Designer supports the latest version of Google Chrome. Download and install from https://www.google.com/chrome
- Note that HARK Designer also works basically both on Firefox and Safari.
Install
For Linux users
- Add HARK repository. See https://www.hark.jp/install/linux/ for details.
- Install HARK Designer
sudo apt-get install hark-designer
For Windows users
- Download HARK installer from https://www.hark.jp/install/windows/
- Install it
Step 1: Open the HARK Designer
For Linux users
On the terminal, run hark_designer.
Then, chrome browser will be opened immediately.
For Windows users
After you installed the HARK Designer, you will see the icon of HARK Designer on your desktop. When you double-click it, then
- node.js application runs, and
- Google Chrome opens and access to http://localhost:3000.
You will see a web page as shown in the following figure.
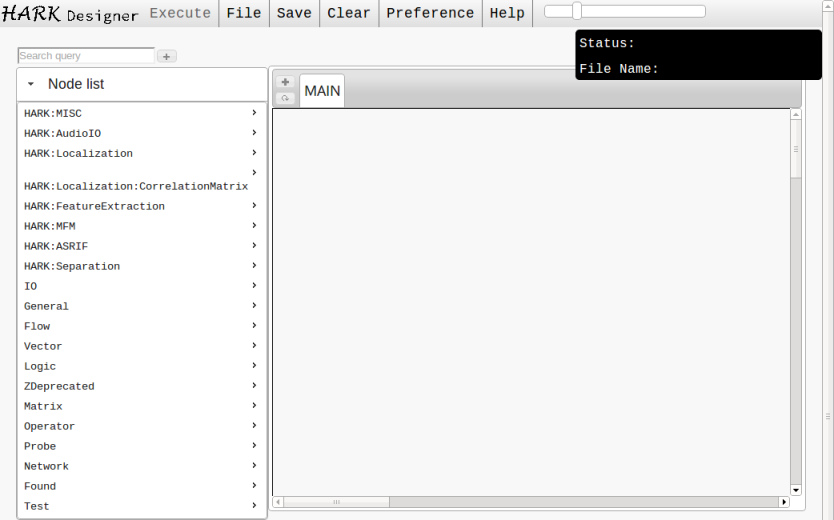
Step 1: The initial screen.
Step 2: Add Nodes
First, you need to add nodes. In this case, add Constant and InputStream, which are both in General category.
You have two ways to add these nodes:
- On the Node list on the left side of the window, click General and click Constant, then, click General and InputStream.
- Type the name Constant or InputStream to the input box above the Node list. You can incrementally search nodes. You can select a node to add by clicking or pressing arrow keys and Enter key.
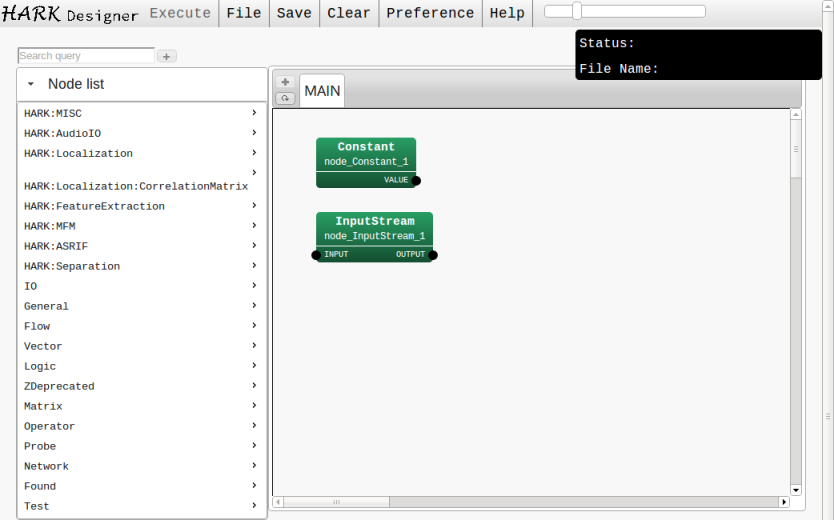
Step 2: Two nodes are added to the MAIN network.
Step 3: Connect Nodes
Then, connect the two nodes. Drag the output terminal VALUE of Constant, and drop at the input terminal INPUT of InputStream.
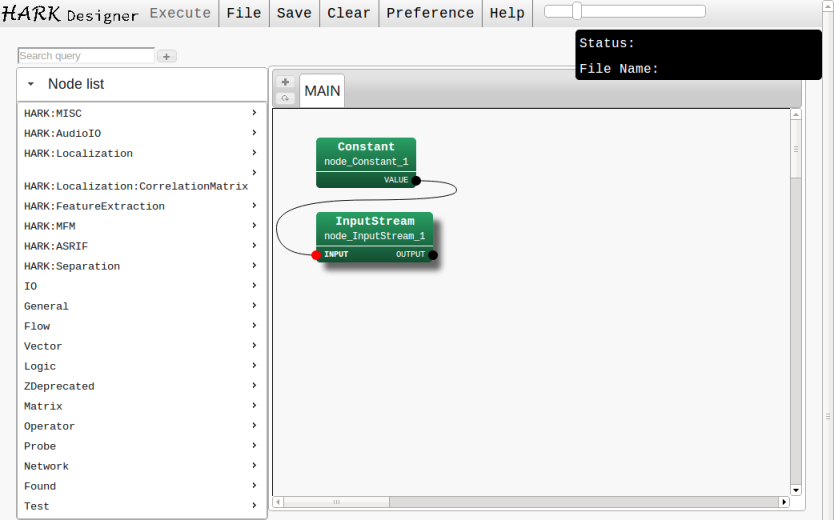
Step 3: Two nodes are connected.
Step 4: Add a New Sheet
Let’s add a new sheet, which contains a set of nodes. Click the add sheet button next to MAIN network (marked as red circle in the figure), then, a dialog will appear. Input a name of your new sheet and select a type. In this case, the name is LOOP0 and the type is iterator.
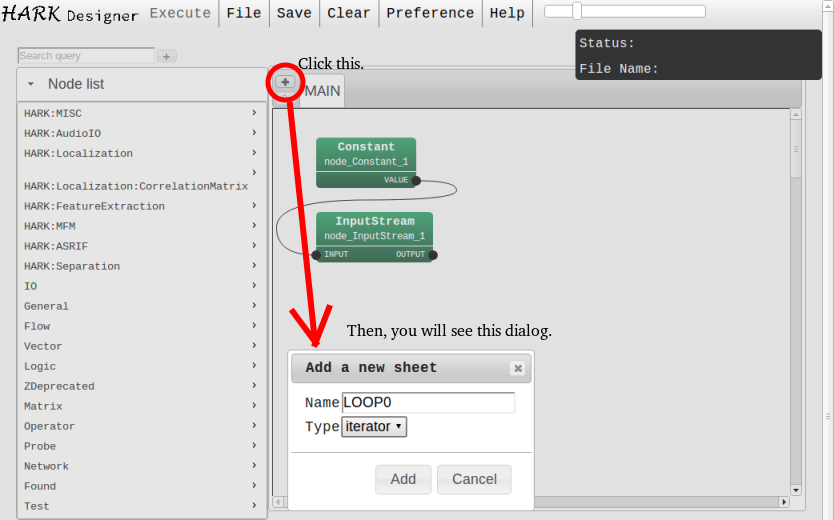
Step 4: A dialog for adding a new sheet
Step 5: Add and Connect Nodes in the New Sheet
Similar to step 1, add five nodes: AudioStreamFromMic, MultiFFT, LocalizeMUSIC, SourceTracker, and DisplayLocalization on the iterator sheet LOOP0. Then, connect them as shown in the figure.
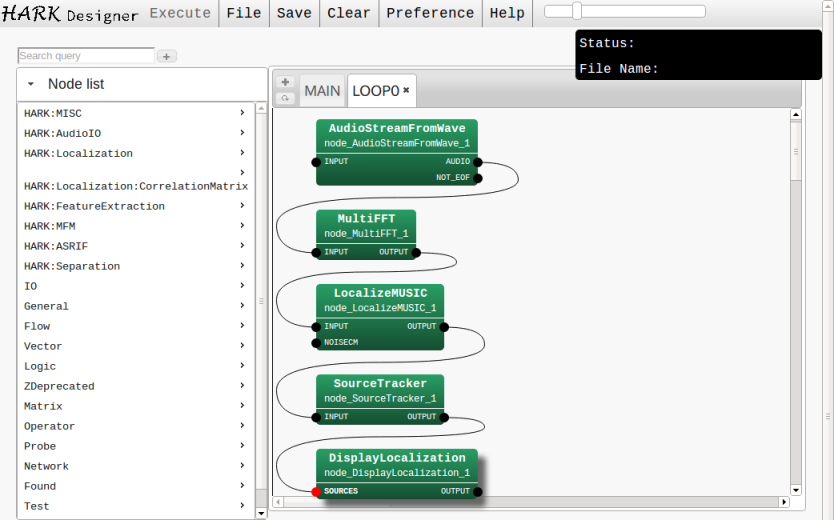
Step 5: Five nodes are connected.
Step 6: Automatic Alignment
Let’s try some features of HARK Designer. The first one is “automatic alignment”, that automatically changes the orders of nodes. Click a button shown in the figure. Then, HARK Designer automatically realign the node positions. Use it if your network gets messy.
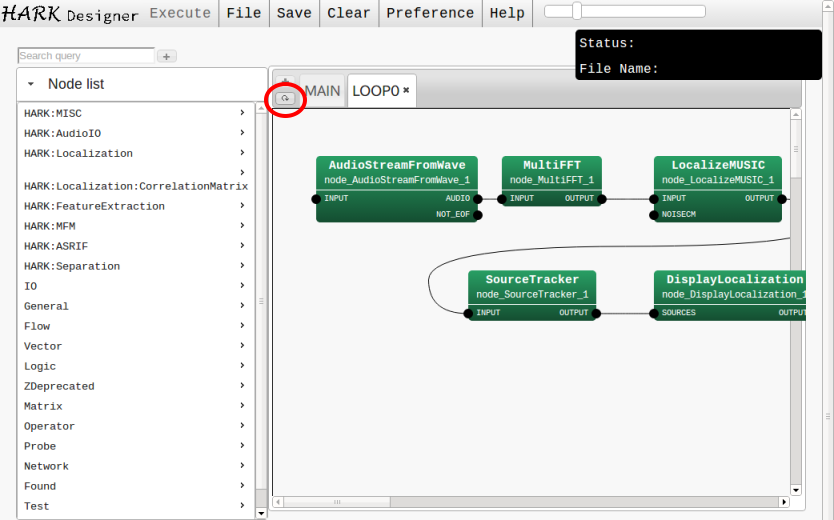
Step 6: The result of automatic alignment
Step 7: Hide Node List
Another feature of HARK Designer is “hiding a node list”. Click the button named “Hide list” next to the input box for node search. Then, you can hide the list and enlarge the area of the network.
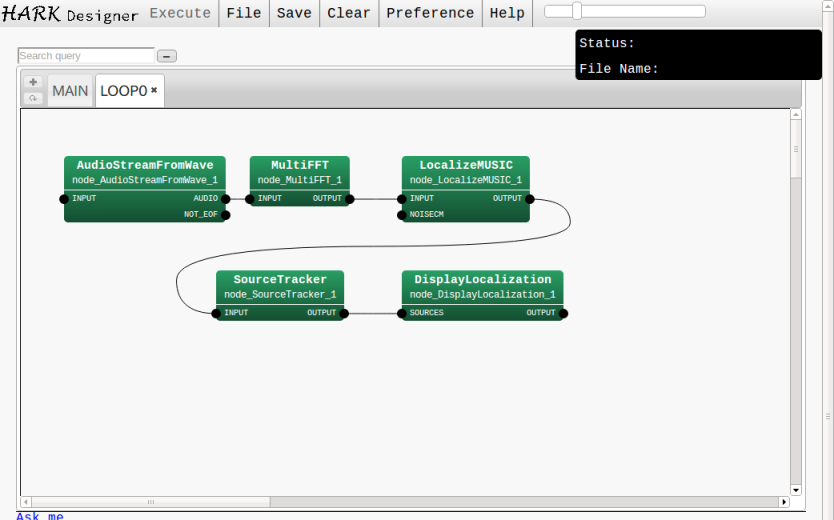
Step 7: Node list is hidden.
Step 8: Configure Parameters
To configure the parameters of the node, you can open the parameter dialog by (1) double-clicking the node or (2) right click the node and select “Property”. On the dialog, you can select the type and value of the parameters and click OK to apply the changes.
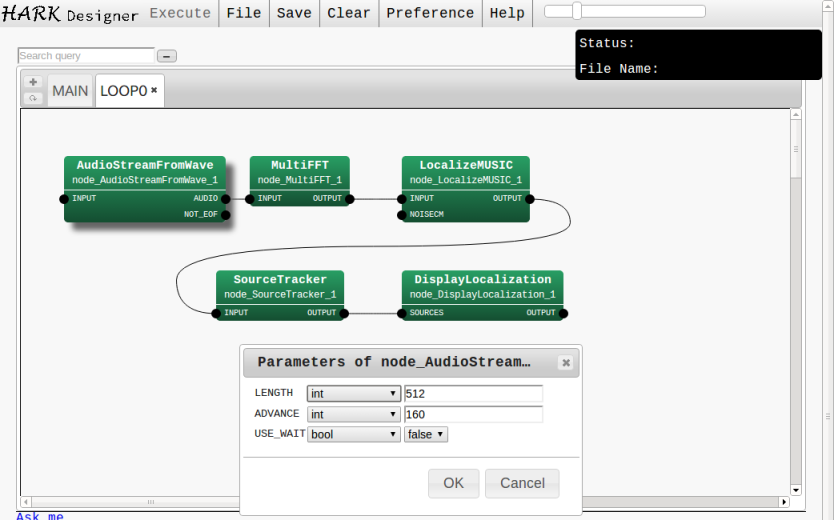
Step 8: A parameter dialog for AudioStreamFromWave.
Step 9: Set Terminal Roles
Then, set the terminals roles. Right-click a terminal that you want to give a role, and select from a context menu.

Step 9:
Descriptions of HARK Designer Components
This section describes the key components of HARK Designer, Node, Links, Sheet, and Terminal Role. A network, that is a program code in HARK, consists of these components.
Node
Overview
Each node represents a process of robot audition. The category of nodes is twofold: a (normal) node and a dynamic node:
- Normal node
- Basically, the (normal) nodes are written by C++, e.g., multichannel fast Fourier transform (MultiFFT), sound source localization (LocalizeMUSIC), and sound source separation (GHDSS).
- Dynamic node
- A dynamic node has a sheet consists of multiple nodes (See Sheet section to know about the dynamic node).
How they look like
Graphical representation of a node is a box with some terminals. The terminals on the left side of a box represent the inputs of the node, and ones on the right side represent the outputs of the node. The input and output terminals are analogous to arguments and return values of a function, respectively.
You can change the color of the nodes through Preference
Configuring Nodes
Each node have its own parameters. You can specify a parameter, such as a threshold or FFT length, to change the behavior of the node. Each parameter has a type, e.g., int, float, bool, subnet_param.... When you select “subnet_param” as a type, the parameter is assigned as a parameter of a dynamic node of the sheet. If you give the same subnet_param name to multiple parameters, you can modify all values with the parameter of the dynamic node.
Link
Overview
A link connects two terminals of different nodes. The links represent the data flow in a network, i.e., if two terminals are connected, the data is thrown through the link.
The links must connect the terminals that have the same type (type can be, e.g., int, float, vector<float> ,...). If you try to connect the terminals having different types you will see an error message in the console.
Not that the input terminal can have multiple links, but the output terminal can have one link.
How they look like
By default, the link is shown as as Bezier curve. You can change to the polyline from Preference
Sheet
Overview
Sheet is a set of nodes and links, which is analogous to a subroutine. The behavior of a sheet depends on its type; if the sheet type is subnet, it simply represents a group of nodes. If the sheet type is iterator, it represents a loop; all nodes in an iterator are called iteratively until its terminal node “CONDITION” becomes false.
How they look like
When you add a new sheet, a new tab will shown in the window. You can see and modify the sheet by clicking the tab.
At the same time, you can see a dynamic node that represents the sheet, as if the sheet is a subroutine. The dynamic nodes are added in “Dynamic” category. For example, if you add a MainLoop iterator sheet, you can put a new node named MainLoop in other sheets.
Terminal Role
Overview
Terminal role represents a special role given to a terminal of a node. The terminal role is threefold: INPUT, OUTPUT, and CONDITION. INPUT or OUTPUT terminal role represents an input or output of the sheet. If a terminal has INPUT or OUTPUT role, a dynamic node that includes the node will have a new input or output terminal. CONDITION terminal role is valid only if the node is in a iterator sheet. The iteration ends if the node outputs false to the node.
How they look like
The terminal role is represented as a bold text put on next to the terminal.
Operations of HARK Designer
Node
You can do the following operations for nodes.
Add
You can select a node from the node list in the sidebar.
- By Mouse
Click a category, e.g., HARK:Separation, and click a node name. You can add a new node in the current sheet.
- By Keyboard
You can incrementally search a node. Type a part of a node name in the node search box. You can select a node by arrow keys, and add a node by enter key.
You can also copy and paste. Select multiple nodes and type Ctrl+C or Ctrl+X for copying or cutting. Then, type Ctrl+V to paste the nodes.
Select
Selected node will have a shadow.
- By Mouse
You can select a node by clicking a node or multiple nodes by dragging an area.
- By Keyboard
You can select a node using Tab key. Ctrl + A is a shortcut for selecting all nodes.
Move
- By Mouse
You can move one node by dragging it. If multiple nodes are selected, they are also dragged.
- By Keyboard
You can select multiple nodes you have selected using arrow keys or hjkl keys, i.e., vim-like key binding.
Delete
When you delete a node, the links connected to the node will also removed automatically.
- By Mouse
Right click a node and select “Delete”, then, you can delete the node.
- By Keyboard
Press Delete button to delete all selected nodes.
Parameter Configuration
Opening a parameters dialog
- By Mouse
You can open a parameter dialog by (1) right-clicking a node and select “Property” or (2) double-clicking a node.
- By Keyboard
Select a node and press Enter key. You will see parameter dialogs.
Edit parameters
Each row in the dialog corresponds to a parameter, you will see (1) the name, (2) the type, and (3) the value. You can change the type of the parameter in a drop-down list (int, float, ...) and add a value in the input box.
When you select subnet_param as a type, the value becomes the parameter name, and the corresponding dynamic node will have a new parameter whose name is the value.
When you select file as a type, you can select a file name you have uploaded.
HARK Designer automatically checks the input. If you input a wrong value, for example, input a value “12.5” to int type, the dialog will indicate the error.
Add/Delete terminals
You can add a terminal manually. These terminals are valid only if the node accepts the additional terminals. Only mouse operation is supported for this action.
To add a terminal, right click a node and select “Add Input” or “Add Output”, then you can specify the name of the new terminal.
To delete a terminal, right click the added terminal and select “Delete Input” or “Delete Output”.
Help
When you right click the node and select help, you can see a web page that describes the node.
Link
You can do the following operations for links.
Connect
Drag a terminal (black circle) and drop at a terminal you want to connect. You can connect only (1) an input and an output, not input-input nor output-output, (2) the terminals with the same types.
When you start dragging, HARK Designer suggests the terminals that you can connect by gray lines.
Delete a link
Right-click the terminal and select “Delete the link”, then, you can delete the link.
Sheet
You can do the following operations for sheets.
Add a sheet
Click the plus icon on the left of MAIN tab. Then you can specify the name and the type of a new sheet. Click the new tab to open the sheet.
Delete a sheet
Click the cross icon on the right of a sheet you want to delete, or right-click the sheet and select “Delete the sheet”.
Configure a sheet
To change the sheet name, right-click the sheet tab and select “Change the name”. To change the sheet type, right-click the sheet tab and select “Change to subnet” or “Change to iterator”.
Dynamic node
When you add a new sheet, you can find a dynamic node whose name is the sheet name in the node list. The category name is Dynamic.
Create a sheet from selected nodes (From 2.3.0)
Select a set of nodes, right-click, and select “Create sheet from selected”. Then, it creates a new sheet with the selected nodes.
Terminal Role
You can do the following operations for terminal roles.
Add a role to a terminal
Right-click a terminal, select “Set as Input” or “Set as Output”, and give the name for the role. You will see the role name in the terminal, and the dynamic node will have the input or output.
Delete a role to a terminal
Right-click a terminal and select “Delete Output” or “Delete Input”. The role name and corresponding terminals of the dynamic node will disappear.
Buttons and Console
On the top of the HARK Designer, you will see thee components: buttons, a slider, and a console shown as a black box. This section describes the role of each component.
Execute Button
When you click this button, you can execute the network. If you get an error, you will see the error message in the console. This button is deactivated until you save the network.
File Manager Button
Using the File Manager, you can upload and download files, and load a network. Although the default path for storing all the files is an installed directory, the users can change the path to local directories too (From HARK 2.3.0). To change the path, edit the “Path” input box and type Enter. You can specify the child direcoties using “Browse Directory” button.
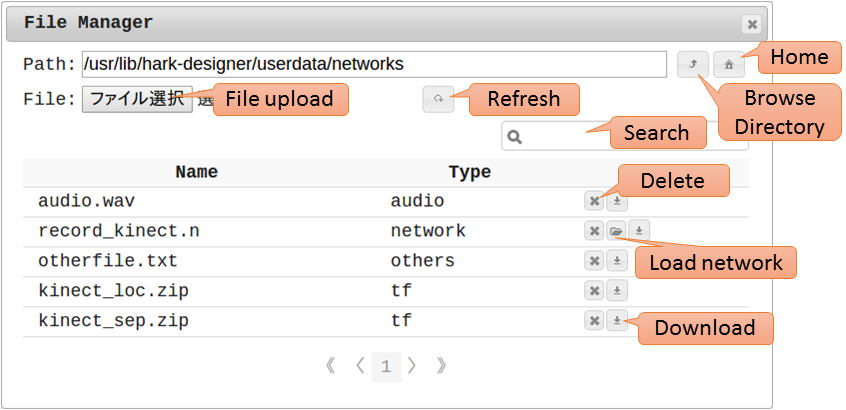
Screen shot of the File Manager
- Uploading
- Click the button next to File: shown as “File upload”. You can upload multiple files.
- File list
The files in a path is shown in the lower part of the dialog. For each file, you can see its file type, file name, and two or three buttons: delete, load and download.
The download button is to download the file via browser, the load button, which is shown only for network files, is to load the network to HARK Designer. The delete button is to delete the file.
File type has four kinds: audio, tf, network, others, and unknown. They are automatically determined by its content or extension.
- If the extension is ”.wav” or ”.raw”, the type becomes “audio”.
- If the extension is ”.zip” and the content is tf, the type becomes “tf”.
- If the extension is ”.n”, the type becomes “network”.
- If the extension is anything else, the type becomes “others”.
- If the file is not uploaded through this dialog, the type becomes “unknown”. (Before 2.3.0)
- Refresh
- Although the file list is refreshed for each uploading, you can refresh the list manually
- Search
- Incremental serach box for finding a file. Type a part of a file name that you are looking for in the search box.
- Path
- The real path is shown in this box. You can access this path to directly access the directory.
- Browse Directory
- You can select path by Directory Browser. You can use GUI interface to select a specific directory under the path written in Path.
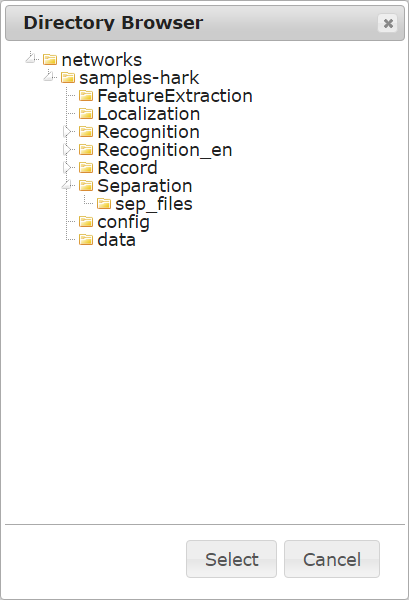
Screen shot of Direcotry Browser.
- Home
- Click this button to go back to the home path.
Save Button
You can save the current network. The saved network can be found in File Manager.
Ctrl+S is a shortcut command for this.
Clear Button
This button clears the current network.
Preference Button
You can change the look-and-feel or check the version.
- Package
- You can add which package to show and hide using the button on the left column. You can also change the color of the nodes using the combo box on the right column.
- Display
- You can change the line shape. Current options are Bezier curves or polylines.
- You can change the language. Currently, this option affects the Help button.
- By default, many buttons shows tooltips when you put a mouse cursor over parts, e.g., buttons. You can deactivate them.
- You can deactivate suggestions connectable links, when you start dragging a terminal.
- You can change whether to fold or not the network by automatic alignment.
- Version
- You can check the version of installed
 packages.
 - All Reset
- You can reset all configurations.
- Tutorial
- You can see a description of main features. Press Escape key to finish.
- Environment
You can configure the execution environment.
- ROS:
- If the ROS is installed on your system, you will see the list of ROS versions.
- Environment Variables:
Click “Add new variable”, then, you can set a variable name and its value. Click the minus button on the variable, then, you can remove the variable. Click “Apply” to apply the variable. You can set as many variables as you want.
If the variable name already exists, that value is connected as ”:”. For example, if you add a variable
PATHto/my/pathand the system already hasPATH=/already/set/path, then, the variable will bePATH=/already/set/path:/my/path.
Zoom slider
Using the slider, you can change the size of the node.
Console
The console, a black box on the top-right, shows the current status of HARK Designer.
Status column
If you have any error, the message will be shown in the “Status:” row. When you put your mouse to the Status column, the clear button will be shown. You can clear the message with the button. If the message is too long, HARK Designer automatically shows “see more” link. When you click the link, the complete log will be shown as a new window.
File Name column
Current file name is shown in “File Name:” row. If the column is not empty, i.e., you have not saved yet, you cannot execute the network.
Troubleshooting
Node is disappeared.
If you have troubles about the node positions, use automatic alignment. This function overwrites all existing nodes.
I want to reset everything.
HARK Designer provides some ways to reset.
- Reload the web page You will start the application.
- Click Preferences -> All reset HARK Designer forgets all user preferences. Technically, it clears localStorage, which is a storage space of a browser, defined in HTML5.
- Delete *.json in the path to the HARK Designer/fileinfo-cache to clear files. Thease are cache files of HARK Designer‘s file list information.
- (Old version)Delete db.userfile in the path to the HARK Designer to clear files. This is a file database of HARK Designer. Therefore, File Manager Dialog has some error if the file is corrupted. Even if you delete db.userfile, the uploaded files will not be deleted since db.userfile is only a list of files. You can re-create it by uploading them again.
I want to known what error is occurred
Many modern browsers has good debugging systems. For example, Google Chrome,
- Right-click the browser. Note that we disabled the default context menu at some places.
- Select Inspect. Then, a new window will appear.
- Click Console tab.
In the Console tab, you will see messages such as errors and debug messages. Debugging will become much easier if you also send the error message to us.
Executing through HARK Designer fails
If you have a trouble about Execute button, please try to access the file and run without HARK Designer.
How to find the file
The file path can be found in the path of File Manager dialog. Cut the “Path” input box, and access with the browser.
How to run the network without HARK Designer
- Linux open a terminal, cd to the path, and run
batchflow your_network.n - Windows open an Anaconda Prompt, cd to the path, and run
batchflow your_network.n
- Linux open a terminal, cd to the path, and run
Feedback
If you found any bugs or recommendations, please use HARK Forum. https://wp.hark.jp